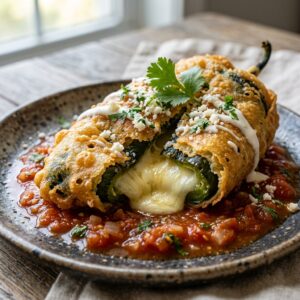
You know, I still have nightmares about the first time I tried to cook a “fancy” dinner for my roommates back in my twenties. I was totally broke, so I grabbed a jumbo pack of meat because it was the cheapest thing in the cooler, thinking I struck gold. I just threw them in a pan with zero prep and prayed for the best. Big mistake. The skin came out looking like a wet rubber glove, and the meat was somehow dry as a bone inside. It was embarrassing! But honestly, finally mastering baked chicken leg quarters changed my weeknight routine forever. They are super affordable and actually have way more flavor than those boring chicken breasts everyone buys. Once I figured out the simple trick to get that skin crispy without burning the house down, I never looked back. Now, I make them almost every week because they’re foolproof and delicious.
 1")
Why Choose Chicken Leg Quarters?
Honestly, I used to be a total chicken breast snob. I thought they were the “healthy” choice and the only thing worth buying, even though they tasted like cardboard half the time. But let’s be real, groceries are getting expensive, and I had to start looking for budget friendly meals that wouldn’t make my bank account cry. That’s when I stumbled upon leg quarters.
It was a total accident. I was rushing through the store after a long day of teaching, and I saw a huge bag of them for pennies on the dollar compared to the boneless stuff. I grabbed them, thinking I’d figure it out later. Now, baked chicken leg quarters are a staple in my rotation.
The Price is Right
Let’s talk numbers for a second because I love a good deal. You can usually get leg quarters for significantly less per pound than breasts or wings. It’s actually kind of wild.
I remember doing the math one time standing in the aisle; I could feed my whole family for the price of my morning coffee run. If you are trying to stretch your dollar, this is the way to do it. You get the drumstick and the thigh connected, which is a lot of meat for very little cash.
Plus, you aren’t paying for someone else to butcher it for you. You’re just buying the chicken as it comes, which saves a ton of money. It’s a huge win for anyone looking for affordable protein.
Flavor That Saves You from Stress
Here is my confession: I am easily distracted in the kitchen. Between grading papers and trying to keep the house from falling apart, I forget things in the oven constantly.
If you leave a chicken breast in five minutes too long, it’s ruined. It becomes dry and stringy, and everyone at the table gives you that polite “this is nice” look while chugging water. But leg quarters? They are incredibly forgiving.
Because they are dark meat, they have a higher fat content. That fat renders down while they cook, keeping the meat juicy even if you leave them in a bit too long. It’s basically insurance against a bad dinner.
I’ve accidentally left baked chicken leg quarters in the oven while handling a phone call, and they still came out tasting amazing. The dark meat chicken recipes always seem to have more depth of flavor, too. It’s rich, savory, and satisfying in a way white meat just isn’t.
Meal Prep Hero
I am all about cooking once and eating twice. Or three times, if I’m lucky. Leg quarters are huge, so unless you have a teenager with a bottomless pit of a stomach, you might have leftovers.
I usually roast a big tray on Sunday. We eat them hot and fresh for dinner, and then I pull the meat off the bones for the rest of the week. It’s perfect for meal prep ideas.
I’ll throw the shredded meat into tacos, stir-fries, or a big salad for lunch. It holds up really well in the fridge without getting that weird “leftover chicken” funk. It stays moist and delicious for days.
So, if you’ve been ignoring this cut of meat, stop it. You are missing out on one of the easiest, tastiest, and cheapest meals out there. Give it a shot, and I promise you won’t regret it.
 2")
The Secret Science to Crispy Skin
Okay, we need to have a serious talk about chicken skin. For the longest time, my baked chicken leg quarters came out with skin that was… well, sad. It was rubbery, flabby, and honestly kind of gross. I’d usually just peel it off and throw it away, which is a crime against poultry if you ask me now.
I remember serving a roast chicken to a guy I was dating years ago. I was so proud until he tried to cut into it and the whole skin just slid off in one gray, slimy sheet. I wanted to crawl under the table. That relationship didn’t last, but luckily, my cooking skills improved. I spent way too much time reading food blogs and experimenting to figure out exactly how to get that crispy chicken skin that actually crunches.
It turns out, moisture is the enemy. If the skin is wet when it goes into the oven, it steams instead of roasts. Nobody wants steamed skin.
The Paper Towel Rule
This is the most important step, and you cannot skip it. When you take the chicken out of the package, it’s usually sitting in those juices. You have to dry it off completely.
I grab a huge wad of paper towels and pat every inch of the chicken dry. I’m talking bone-dry. You want it to feel tacky to the touch. If you skip this, you’re doomed from the start. I used to think a quick dab was enough, but I was wrong. Get in all the creases and folds.
The Magic Powder
This sounds weird, but hear me out. Baking powder is the secret weapon. Not baking soda—that tastes like metal and will ruin your dinner. I’m talking about aluminum-free baking powder.
I mix a little bit into my spice rub. It does something science-y to the pH level of the skin that helps it bubble up and get incredibly crisp. I was skeptical the first time I tried the baking powder trick, thinking I’d taste it, but you don’t. It just works. It’s a total game changer for oven roasted chicken.
Get Some Air
Another mistake I made for years was plopping the legs straight onto a baking sheet. When you do that, the bottom sits in its own grease and gets soggy. It’s impossible to get a consistent crunch that way.
Now, I always use a wire rack placed inside a baking sheet. This lets the hot air circulate all around the meat. It cooks the bottom just as well as the top. If you don’t have a rack, you can prop them up on some roughly chopped veggies, but a rack is better for pure crispiness.
Turn Up the Heat
Finally, stop being afraid of high heat. I used to bake everything at 350°F because I thought high heat would burn it. But 350°F is just too low for what we want here.
You need to blast it. I usually start my oven at 400°F or even 425°F. That high temperature renders the fat quickly and fries the skin in its own juices. It makes a huge difference. Just keep an eye on it so your spices don’t scorch, but don’t baby it with low temps. Trust the heat.
 3")
Essential Ingredients and Substitutions
I used to be that person who bought a different pre-made spice blend for everything. I had a “steak rub,” a “poultry seasoning,” and some random “fish magic” jar that sat in my cupboard for five years. It was a waste of money and space. I eventually realized that making baked chicken leg quarters doesn’t require a trip to a specialty store. You probably have everything you need right now.
Honest truth: the best chicken I ever made had four ingredients on it. Sometimes we overthink flavor and end up muddying the water. Simple is usually better, especially when you are tired on a Tuesday night.
The Oil Dilemma
Let’s start with the glue that holds everything together. You need oil to help the skin crisp up and to make the spices stick. But don’t make the mistake I did.
I once used a fancy extra virgin olive oil for roasting at high heat. Within ten minutes, my kitchen looked like a foggy London morning. The smoke detector was screaming, and I was frantically waving a kitchen towel at the ceiling. It was chaos.
Extra virgin olive oil has a low smoke point. It burns easily. Now, I stick to avocado oil cooking or just regular, light olive oil. They can handle the heat without turning your kitchen into a smokehouse. If you are really in a pinch, melted butter works, but it can burn too if you aren’t careful.
The Spice Cabinet Essentials
You don’t need to be a wizard with spices to make this taste good. My go-to blend is basically the holy trinity of the spice drawer: garlic powder, onion powder, and paprika.
I put garlic powder on everything. Just make sure you aren’t grabbing garlic salt by mistake. I’ve done that before, and the chicken came out so salty it was inedible. We had to order pizza.
Onion powder uses are endless, but it really shines here by adding a savory depth that fresh onions just can’t do in the oven (they tend to burn). And then there is paprika.
If you want to feel a little fancy, swap regular paprika for smoked paprika recipes. It gives the meat this incredible, wood-fired taste like you cooked it outside on a grill, even if it’s snowing outside. It adds great color, too.
Herbs: Fresh vs. Dried
I love the idea of fresh herbs. They look beautiful in photos. But let’s be real—half the time I buy a bunch of thyme or rosemary, I use two sprigs and the rest turns into a slimy science experiment in my crisper drawer.
For baked chicken leg quarters, dried herbs are totally fine. In fact, they sometimes work better because they don’t burn as quickly as fresh leaves do at high temperatures. I usually toss in some dried oregano or thyme.
If you do have fresh herbs for poultry hanging around, throw them on after the chicken is done cooking. It adds a pop of freshness without the risk of eating burnt leaves.
The Salt Factor
Finally, salt. This is where most people mess up. You have to be generous. Chicken can take a lot of salt.
I use coarse Kosher salt because it’s easier to control with my fingers. If you are using fine table salt, use way less or it will be a salt lick. I learned that the hard way during a dinner party. It was mortifying.
The key is to create a homemade spice rub that you like. Taste a little bit on your finger before you put it on the raw meat (obviously don’t touch the raw meat first!). If the rub tastes good, the chicken will taste good. It’s that simple.
 4")
Step-by-Step Instructions for Perfect Baking
Okay, this is where the rubber meets the road. Or I guess, where the chicken meets the heat. I used to think following a recipe meant just tossing things together and hoping for the best. I was very wrong. After ruining more dinners than I care to admit, I realized that the order you do things in actually matters.
It’s not hard, but you have to pay attention. Making baked chicken leg quarters is pretty straightforward once you get the rhythm down. Just don’t try to rush it, or you’ll end up with a sad, soggy meal.
The Prep Work
First things first, get that oven hot. I mean, really hot. Preheat it to 400°F (200°C). Do not—and I repeat, do not—put the chicken in while the oven is still warming up. I did this once because I was starving, and the skin turned out flabby and gross. It was a disaster.
While the oven is doing its thing, prep your pan. Line a baking sheet with foil for easy cleanup (nobody likes scrubbing grease). Then, place a wire rack on top. The roasting rack benefits are huge because it lets air circulate underneath, so you don’t get a soggy bottom.
getting Dirty
Now for the part that grosses some people out. You have to touch the meat. I know, it feels cold and slimy, like a wet balloon. But you have to do it.
Don’t just sprinkle your seasoning on top of the skin. That’s rookie stuff. You need to gently lift the skin and rub the spices directly onto the meat underneath. I used to skip this because I didn’t want to get my hands dirty, but the flavor difference is night and day.
It makes the meat actually taste like something other than plain chicken. Rub the rest of the mix all over the outside of the skin. Be aggressive with it.
Don’t Crowd the Pan
Here is a mistake I made for years: trying to fit too much food on one pan. If the chicken legs are touching each other, they will steam instead of roast.
Steam is the enemy of crispiness. Give them some personal space. If you are cooking for a crowd, use two pans. It’s worth the extra cleanup to avoid soggy skin. Arranging them properly is one of the easiest easy oven recipes tips I can give you.
The Temperature Check
Pop them in the center of the oven. At 400°F, they usually need about 40 to 45 minutes. But ovens are liars. My oven runs hot, so I always check early.
The only way to be 100% sure is to use a tool. A meat thermometer guide will tell you that chicken is safe at 165°F. However, for dark meat like leg quarters, I actually like to take them to about 175°F or even 180°F.
Dark meat gets more tender the longer it cooks, unlike breast meat which turns to sawdust. The internal temperature for chicken legs is very forgiving. If the juices run clear when you poke it, you are usually good to go.
The Hardest Part: Waiting
This is where I struggle. The kitchen smells amazing, you’re hungry, and you just want to eat. But you have to let the meat rest.
Pull the pan out and let it sit for at least 5 to 10 minutes. If you cut into it right away, all those delicious juices will run out onto the plate, and the meat will be dry. I’ve ruined perfectly cooked chicken by being impatient. Just cover it loosely with foil and go set the table or pour a drink. It’s worth the wait.
 5")
Serving Suggestions and Side Dishes
Now that you’ve got those baked chicken leg quarters looking all golden and perfect, you need some stuff to put on the plate next to them. I used to be so exhausted by the time the chicken was done that I’d just throw a piece of white bread on the side and call it a day. It was pretty pathetic, honestly. But I’ve learned that the right sides actually make the meal feel like a real “event” rather than just a Tuesday night scramble.
When you are picking your sides, think about stuff that can soak up those amazing chicken juices. That’s the best part of the whole meal!
The Classic Comfort Route
If I’m feeling like I need a big hug in food form, I always go with mashed potatoes. There is just something about a big pile of buttery potatoes with a crispy chicken leg leaning against it that makes everything okay.
I also love roasting some green beans on a separate pan at the same time the chicken is cooking. It’s one of those sheet pan supper tricks that saves me from doing more dishes than I have to. Just toss them in oil and salt, and they come out tender and slightly charred.
Keeping it Light and Fresh
Sometimes, especially in the summer, a heavy potato side feels like too much. When I want to keep things a bit healthier, I’ll whip up a big kale salad with a lemon dressing.
The acidity in the lemon really cuts through the richness of the dark meat. It’s a great way to balance out a keto chicken dinner if you are watching your carbs. Another trick I use is cauliflower rice—it sounds boring, but if you cook it with a little garlic and onion, it’s actually quite good.
Don’t Forget the Sauce
Even though these legs are juicy enough on their own, I’m a total sauce person. I love a good drizzle.
Lately, I’ve been obsessed with hot honey. You just mix a little honey with some crushed red pepper flakes and pour it over the crispy skin right before you eat. It’s sweet, spicy, and kind of addictive. Or, if I’m feeling lazy, I just use a standard BBQ sauce I have in the fridge.
Just remember, there aren’t really any rules here. Whatever you have in your pantry that sounds good probably is. Cooking should be fun, not another chore on your to-do list.
 6")
I really hope you give these baked chicken leg quarters a try the next time you’re staring at the grocery store shelf wondering what to make for dinner. It took me a lot of rubbery skins and smoky kitchens to figure out that the best meals really do come from the simplest techniques. Just remember to dry that skin off like your life depends on it and don’t be afraid to crank up the heat to get that perfect crunch! Honestly, once you see how much flavor you get for just a few dollars, those expensive chicken breasts will start looking pretty boring.
Cooking for your family doesn’t have to be a stressful or expensive production every single night. Sometimes, a tray of golden, juicy chicken and a side of messy mashed potatoes is all you need to turn a bad day around. If you’ve learned anything from my kitchen disasters, let it be that mistakes are just part of the recipe for becoming a better cook! I’d love to hear how yours turned out or if you found a new favorite spice blend to throw in the mix. If you loved this recipe and want to save it for later, make sure to share it on Pinterest so you can find it whenever that chicken craving hits!