Raise your hand if you have ever stood in the grocery aisle, staring at a four-dollar protein bar, wondering if it is made of solid gold. As a teacher, I hit that 2:00 PM slump hard, but my wallet just cannot handle those prices every day. Plus, half the time, the ingredients list looks more like a chemistry exam than actual food. I knew I needed a better solution, and that is how these chocolate peanut butter chia bars became my absolute go-to.
I used to try baking granola bars, but they usually came out hard enough to break a window. That is why I love this recipe—it is completely no-bake. You literally just mix, press, and chill.
These chocolate peanut butter chia bars are a total lifesaver for my Sunday meal prep. They are packed with rolled oats and healthy fats that actually keep me full until the final bell rings. Just make sure you press them firmly into the pan, or you will end up with savory granola—I learned that one the hard way! If you want a delicious energy boost without the sugar crash, let’s get started.

Why You Will Love These Chocolate Peanut Butter Chia Bars
I have to be honest with you; I am a total snacker. If there is a bag of chips in the staff room, I am going to find it. But a few years ago, I realized that my afternoon sugar habit was actually making me more tired. I needed a healthy snack that felt like a treat but didn’t make me want to take a nap under my desk. That is exactly why I fell in love with these bars.
They Are a Nutritional Powerhouse
When I first started trying to eat better, I thought “healthy” meant eating food that tasted like cardboard. I was so wrong. These chocolate peanut butter chia bars are loaded with protein and fiber, which is the secret combo for staying full.
There was a time I tried to survive on just an apple for breakfast. By 10:00 AM, my stomach was growling so loud my students started giggling during the test. Never again. The oats provide that slow-burning energy we all need, while the chia seeds sneak in those important omega-3s. You don’t even taste the seeds; they just add a nice little crunch.
Quick and Easy Meal Prep
I am not a morning person. If I can sleep five extra minutes, I will. This recipe is a savior for my meal prep routine because it requires zero baking. I remember trying a baked granola bar recipe once in the middle of July. My tiny apartment kitchen got so hot I thought I was going to melt.
With these, you just mix and chill. It is perfect for summer or just for when you are feeling lazy (which, for me, is most Sundays). You can whip them up in about 15 minutes. It is basically instant gratification, which is my favorite kind.
Budget-Friendly and Customizable
Have you seen the price of energy bars lately? It is robbery! I did the math once—because yes, I am that kind of nerd—and realized I was spending over $20 a week just on snacks. Making these at home costs a fraction of that.
Plus, you can change them up. I have a friend who is strictly vegan, and she was so happy when I told her this recipe is naturally plant-based if you use maple syrup. If you are gluten-free, just grab the certified gluten-free oats.
Kid-Friendly Snacks I don’t have kids of my own, but my nieces are the pickiest eaters on the planet. I was nervous to let them try these because they usually spot “healthy” food from a mile away. To my surprise, they devoured them. They thought they were eating dessert. If you can trick a six-year-old into eating chia seeds, you are winning at life.

Essential Ingredients for Chia Energy Bars
When I first started trying to eat “clean,” I was terrified I’d have to shop at one of those fancy grocery stores where a bag of flour costs more than my car payment. Thankfully, these chocolate peanut butter chia bars use stuff I mostly already had in my pantry.
I love recipes that don’t require a scavenger hunt. There is nothing more annoying than getting halfway through a recipe and realizing you are missing “fairy dust” or something equally obscure. Here is the lowdown on what you actually need to make these work.
The Base: Rolled Oats
You need old-fashioned rolled oats for this. Please, I am begging you, do not use steel-cut oats. I made that mistake once thinking I was being “extra healthy.” It was like chewing on gravel.
Quick oats are okay in a pinch, but they tend to get a little mushy. If you want that nice, chewy texture that feels like a real granola bar, stick with the old-fashioned kind. Also, if you are cooking for someone with allergies, check the label to see if they are certified gluten-free.
The Binder: Creamy Peanut Butter
This is the glue that holds your life—I mean, your bars—together. I prefer using natural organic peanut butter where the only ingredients are peanuts and maybe salt. You know, the kind you have to stir.
If you use the processed stuff with added oils, the bars might turn out a bit drier. If your peanut butter is at the bottom of the jar and hard as a rock (we have all been there), microwave it for 10 seconds to loosen it up. It makes mixing so much easier.
The Sweetener: Maple Syrup or Honey
To get these no-bake oat bars to stick, you need a liquid sweetener. I usually reach for maple syrup because I love that warm, fall flavor, but honey works great too.
I tried using agave once, and it was fine, but the bars were a little softer. Just don’t try to sub this with granulated sugar. It won’t hold the oats together, and you will end up with a bowl of loose granola. Which is tasty, but not what we are going for here.
The Superfood: Chia Seeds
Obviously, you can’t have chocolate peanut butter chia bars without the chia! These little guys are amazing. When they get wet, they expand and get sticky, which helps bind everything.
Plus, they are packed with fiber. I usually buy a big bag from the bulk bin section because it is way cheaper. It doesn’t matter if you use black or white chia seeds; they taste exactly the same.
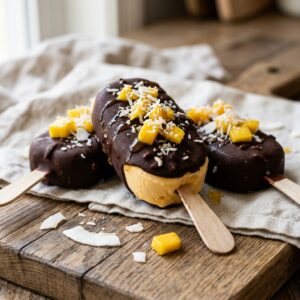
The Best Part: Chocolate Chips
Okay, let’s be real. This is the reason I eat these. I like using dark chocolate chips because they aren’t too sweet, but semi-sweet works too.
I have found that mini chocolate chips work best because they distribute more evenly. That way, you get a little bit of chocolate in every bite. If you are trying to be super strict, you could use cacao nibs, but I need my chocolate fix.

Step-by-Step: How to Make No-Bake Chia Bars
I used to be intimidated by homemade snacks because I thought they required a degree in chemistry and three hours of free time. But trust me, making these chocolate peanut butter chia bars is easier than getting a room full of middle schoolers to be quiet on a Friday afternoon.
You don’t need a food processor or a fancy mixer. Just a bowl and some elbow grease. Here is exactly how I do it, mistakes and all.
Prep Your Station
First things first, get an 8×8 square baking pan and line it with parchment paper. Do not skip this! I once thought I could just grease the pan with butter because I was out of paper. Big mistake.
I spent twenty minutes trying to pry the bars out with a butter knife and ended up ruining half of them. Leave some paper hanging over the edges so you have little “handles” to lift the whole block out later. It makes cleanup a breeze, which is my favorite part of cooking.
Melty Peanut Butter Magic
Grab a large microwave-safe bowl. Add your creamy peanut butter and maple syrup (or honey) into it. Pop it in the microwave for about 30 to 45 seconds.
You want it to be runny and smooth. I used to try mixing cold peanut butter with oats, and it was a workout. My arm was sore for two days. Warming the wet ingredients makes it so much easier to coat the dry ingredients evenly. Whisk them together until they look like caramel.
Mix It Up
Pour in your rolled oats, chia seeds, and a pinch of salt. Stir it all together until every single oat is coated. It will take a minute, so just keep stirring.
Important Lesson: Let the mixture cool for a few minutes before you add the chocolate chips! I was impatient once and dumped the chocolate in while the oats were still hot. The chips melted immediately, and I ended up with chocolate oatmeal instead of chocolate peanut butter chia bars. It was still tasty, but it looked like a muddy mess.
The Press (Crucial Step!)
Dump the mixture into your lined pan. Spread it out as evenly as you can. Now, you need to press it down. Hard.
I usually take a flat-bottomed measuring cup or a glass and press down on the mixture with all my weight. If you don’t pack it tight enough, the bars will crumble apart when you try to eat them. You want them dense and firm. Think of it like packing a snowball—loose snow doesn’t fly well.
Chill Out
This is the hardest part: the waiting game. Put the pan in the fridge and leave it alone for at least two hours. I know, it’s tempting to cut into them early.
I tried slicing them after 30 minutes once because I was hungry, and they just fell apart in my hands. The cold helps the oats absorb the moisture and the fats to solidify. Once they are firm, lift them out using the parchment paper handles and slice them into bars or squares.

Customization Ideas and Variations
I am the type of person who gets bored easily. If I have to eat the exact same thing for breakfast five days in a row, I might lose my mind. That is the beauty of this recipe; it is just a template waiting for your creative spin.
You can tweak these chocolate peanut butter chia bars to fit whatever mood you are in or whatever random ingredients you need to use up before they expire. I treat my pantry like a science lab sometimes.
Nut-Free Options for School
As a teacher, I live in a world where peanuts are contraband. We take allergies seriously, so if I want to bring these as school lunch snacks or share them in the staff room, I have to adapt.
You can easily swap the peanut butter for sunflower seed butter or even pumpkin seed butter. I tried using almond butter once, and it was delicious, though a bit pricier. Just keep in mind that some seed butters are runnier than others.
If your mixture looks too wet, just throw in an extra handful of oats. You don’t need to be a mathematician to figure it out; just eyeball it until it looks sticky but firm.
Boosting the Protein
Sometimes, I go through phases where I try to be a gym rat. During those weeks, I want a little more from my snacks. You can definitely add a scoop of your favorite protein powder to the mix.
However, I made a huge mistake the first time I did this. I added a giant scoop of vanilla whey and didn’t add any extra liquid. The bars turned into bricks that were impossible to chew.
If you add dry powder, you need to balance it out. Add a splash of almond milk or a little more maple syrup to keep the texture right. It helps with plant-based nutrition goals without feeling like you are eating chalk.
Fun Add-Ins and Flavor Swaps
This is where you can really have fun. I love tossing in dried cranberries or chopped dried cherries. The tartness cuts through the rich chocolate and makes it taste like a fancy dessert.
If you are feeling tropical, try adding shredded coconut. I once made a version with white chocolate chips and macadamia nuts, and it tasted like a cookie. My husband asked me to make those again immediately.
You can also sneak in more seeds like hemp hearts or flax meal for extra nutrient dense foods. Just toss them in with the chia seeds. Nobody will even notice they are there, but your body will thank you.
Pro Tip: If you love that “sweet and salty” vibe, sprinkle a little flaky sea salt on top right before you press them into the pan. It makes the flavors pop!

Storage and Freezing Tips
I learned the hard way that these bars are not like the processed ones you buy at the store. Those things can survive a nuclear apocalypse in your pantry. These homemade chocolate peanut butter chia bars, however, need a little more love.
Since we are using natural ingredients without preservatives, you have to treat them like fresh food. If you leave them out on the counter on a warm day, you will end up with a sticky, melted puddle. I made that mistake once and found a very happy trail of ants leading to my counter.
Keep Them Cool
The best place for these bars is the refrigerator. I keep mine in a glass airtight container right at eye level so I don’t forget them. They stay fresh for up to two weeks in the fridge.
Honestly, though, they never last that long in my house. Between my husband sneaking late-night snacks and me grabbing them for breakfast, they are usually gone in five days. The cold texture makes them chewy and firm, which I actually prefer over room temperature.
Freezer Friendly Snacks
If you are an over-achiever and want to batch cooking for the whole month, the freezer is your best friend. These freeze beautifully.
Here is the trick I use: wrap each bar individually in parchment paper or plastic wrap before tossing them in a freezer bag. If you don’t wrap them, they will freeze into one giant, solid brick. Good luck trying to chip just one off at 6:00 AM. They will keep in the freezer for about three months.
Thawing and Serving
When you are ready to eat one, just pull it out of the freezer. You can put it in your lunchbox in the morning, and by snack time, it will be perfect.
If you are impatient like me, you can let it sit on the counter for ten minutes. Do not microwave them to thaw! I tried that once, hoping for a warm treat. I ended up with boiling hot peanut butter lava that burned my tongue. Just let them thaw naturally for the best grab and go food experience.

Time to Get Your Snack Game On
I hope this recipe helps you conquer your snacking demons just like it helped me. There is something so satisfying about opening the fridge, seeing a container full of homemade bars, and knowing you are totally set for the week. No more vending machine regrets or “hangry” outbursts in the middle of a meeting.
These chocolate peanut butter chia bars are proof that eating healthy doesn’t have to be complicated, expensive, or taste like cardboard. It really just takes a bowl, a spoon, and a little bit of patience while they chill in the fridge.
I honestly don’t know how I survived my afternoons without them. They give me that perfect energy boost to power through grading papers without the sugar crash an hour later.
If you make these, do me a huge favor. Pin this recipe to your Healthy Snacks or Meal Prep board on Pinterest so you don’t lose it. Trust me, when that 3:00 PM hunger hits next Tuesday, you will be so glad you did. Happy snacking!